
Table of Contents
Grab Bar Installation Is a Safety, Compliance, and Procurement Issue
Commercial bathroom grab bars are not ordinary wall-mounted accessories. In hotels, hospitals, office towers, malls, airports, schools, senior living facilities, and public restrooms, they directly affect user safety, accessibility compliance, and the long-term reliability of the bathroom package.
For contractors and commerce buyers, the biggest risk is treating grab bars as “late-stage hardware.” In reality, successful installation starts during design coordination. Wall reinforcement, fixture layout, waterproofing, tile planning, grab bar size, anchor type, and final inspection all need to work together.
In the U.S., ADA Accessibility Standards apply to places of public accommodation, commercial facilities, and state or local government facilities in new construction, alterations, and additions. Hotels, restaurants, retail locations, healthcare facilities, and many public-use buildings may also fall under ADA Title III or similar accessibility obligations, depending on project type and jurisdiction. Always verify local code and project-specific requirements before installation.
For commercial projects, SourceZJ can support bulk commercial bathroom accessories for hotels, offices, and public buildings with OEM/ODM customization, project packaging, and coordinated finish options.
1. Confirm the Applicable Standard Before Installation
The first best practice is simple: do not install grab bars based only on habit or a generic drawing. Confirm the applicable accessibility standard, building code, project specification, and local inspection requirement.
In many commercial projects, grab bar installation may be affected by:
| Requirement source | Why it matters |
|---|---|
| ADA Standards | Defines many U.S. accessibility requirements for public and commercial facilities |
| Local building code | May include additional or stricter requirements |
| Project accessibility consultant | Confirms layout for hotels, hospitals, public facilities, and senior living |
| Interior design drawings | Controls fixture positions, tile layout, finish, and visual alignment |
| Manufacturer installation instructions | Controls fastener type, flange size, load rating, and warranty |
| Waterproofing specification | Prevents leaks behind tiled or wet-area walls |
A common mistake is installing grab bars after tile completion without checking whether reinforcement exists behind the wall. This can lead to weak anchoring, cracked tile, failed inspection, or expensive rework.
Best practice: approve the grab bar layout during the rough-in stage, not after finishes are complete.
Send SourceZJ your commercial bathroom drawings and room schedule to discuss grab bar sizes, finishes, packaging, and project-ready accessory coordination.
2. Plan Wall Reinforcement Before Closing the Wall
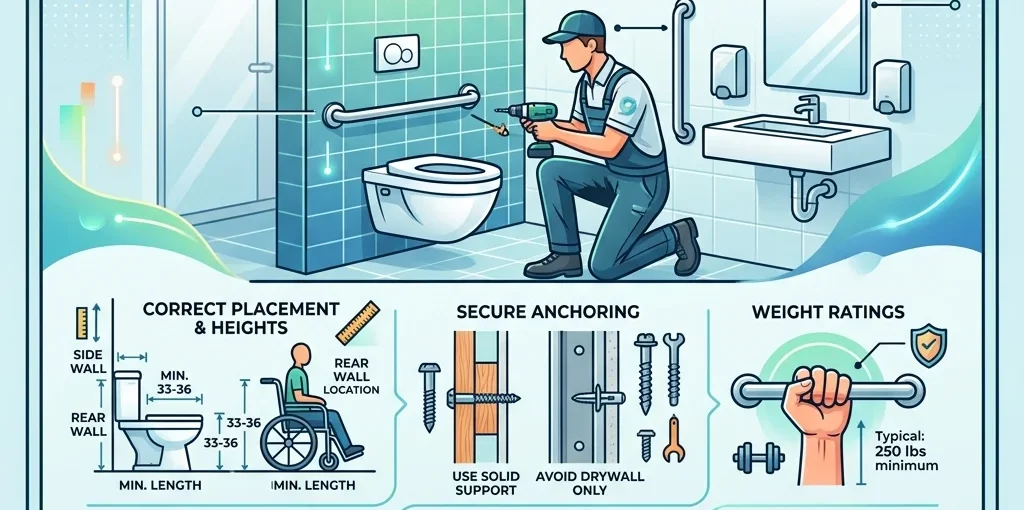
Grab bars must be fixed to a structure that can carry real user loads. Drywall, hollow tile backing, thin panels, or weak anchors alone are not enough for commercial bathroom safety.
The ADA Standards require grab bars, fasteners, mounting devices, and supporting structures to withstand a 250-pound vertical or horizontal force applied at any point without exceeding allowable material stresses.
That requirement affects the wall system, not only the grab bar itself. A high-quality stainless steel grab bar can still fail if the installer uses poor anchors or if the wall behind it is not reinforced.
Recommended substrate strategy
| Wall condition | Best installation approach | Risk if ignored |
|---|---|---|
| New stud wall | Install plywood/blocking or metal backing at required grab bar zones | Future grab bar cannot be securely mounted |
| Masonry wall | Use suitable masonry anchors and verify embedment depth | Loose fasteners or cracked substrate |
| Tiled wet wall | Drill carefully, seal penetrations, anchor into structure | Tile cracking or water intrusion |
| Prefabricated bathroom pod | Coordinate factory-installed backing plates | Site installers may miss hidden structure |
| Existing finished wall | Use scanning, inspection openings, or approved retrofit anchors | Unknown load capacity |
| Lightweight partition | Add engineered reinforcement before installation | Grab bar movement or failure |
For hotels, hospitals, senior living, and public buildings, reinforcement should be shown clearly on shop drawings. The location should allow the final grab bars to meet height, length, spacing, and clearance requirements.
For coordinated project sourcing, SourceZJ OEM and custom bathroom hardware manufacturing support can help buyers define grab bar dimensions, flange styles, surface finishes, and packaging for large commercial bathroom projects.
3. Use Correct Grab Bar Dimensions and Clearances
For ADA-style commercial bathroom grab bars, several dimensions are especially important. Under the ADA Standards, circular grab bars must have an outside diameter of 1¼ inches minimum and 2 inches maximum. Non-circular grab bars must meet specific cross-section and perimeter limits. The space between the wall and grab bar must be 1½ inches, and required horizontal grab bars are generally installed 33–36 inches above the finished floor, measured to the top of the gripping surface.
Key grab bar installation dimensions
| Item | Common ADA requirement | Installation note |
|---|---|---|
| Circular bar outside diameter | 1¼–2 in. | Choose a diameter that is easy to grip |
| Wall clearance behind bar | 1½ in. | Maintain consistent clearance after tile finish |
| Typical horizontal bar height | 33–36 in. AFF | Measure to top of gripping surface |
| Children’s water closet grab bar height | 18–27 in. AFF | Only for children’s use applications |
| Structural force requirement | 250 lb | Applies to bar, fasteners, mounts, and support structure |
| Surface condition | Rounded, not sharp or abrasive | Inspect after installation |
AFF means “above finished floor.” This matters because commercial bathrooms often receive floor tile, leveling layers, anti-slip finishes, or shower slope build-up after rough-in. Always measure from the finished floor, not the structural slab.
Best practice: mark dimensions only after confirming final floor build-up and tile thickness.
4. Install Grab Bars in the Correct Locations for Toilets
For accessible water closets, the ADA Standards require grab bars on the side wall closest to the toilet and on the rear wall. The side wall grab bar must be at least 42 inches long, located 12 inches maximum from the rear wall, and extend 54 inches minimum from the rear wall.
The U.S. Access Board’s toilet room guide also explains that rear and side grab bars can be separate or continuous, and that related plumbing should be located so the rear grab bar remains clear. Grab bars and adjacent surfaces must be free of sharp or abrasive elements, and projecting objects must not interfere with required gripping space.
Toilet grab bar installation checklist
| Checkpoint | Best practice |
|---|---|
| Side wall bar | Confirm length, rear wall offset, and forward extension |
| Rear wall bar | Coordinate with flush valve, tank, carrier, and accessories |
| Toilet centerline | Confirm before drilling; wrong centerline affects compliance |
| Paper dispenser | Keep it from blocking grip or transfer movement |
| Wall finish | Ensure tile edges do not create sharp contact points |
| Fasteners | Anchor into approved backing or masonry |
| Final inspection | Measure from finished floor and finished wall surface |
A frequent commercial mistake is placing toilet paper dispensers, sanitary bins, flush valves, or partition hardware too close to the grab bar. Even if the grab bar itself is at the correct height, nearby objects can make it difficult to grip.
For hotel, office, and public restroom projects, SourceZJ can help coordinate grab bars with commercial bathroom accessories to reduce conflicts between hardware, fixtures, and accessories.
5. Install Shower and Bathtub Grab Bars According to Shower Type
Shower and bathtub grab bars require extra attention because users are standing, transferring, or seated in wet conditions. The correct layout depends on whether the shower is a standard roll-in shower, alternate roll-in shower, transfer shower, or bathtub.
The Access Board’s bathing room guide notes that standard roll-in showers without a seat require grab bars on three walls. Where separate grab bars are used, they must be close to adjacent walls and installed at the same height. Shower controls and fittings must not obstruct the gripping surface.
For bathtubs, ADA provisions distinguish between tubs with permanent seats and those without permanent seats. Depending on the configuration, grab bars may be required on the back wall, control end wall, and head end wall, with certain bars positioned 33–36 inches above the finished floor and lower back-wall bars positioned 8–10 inches above the bathtub rim.
Shower and bathtub coordination points
| Area | What to coordinate | Why it matters |
|---|---|---|
| Shower control wall | Grab bar, mixer, hand shower, hose, shelf | Prevents obstruction |
| Shower seat wall | Seat position and grab bar reach | Supports transfer and seated use |
| Back wall | Bar height and continuity | Improves user stability |
| Bathtub rim | Lower bar position and waterproofing | Supports entry and exit |
| Glass enclosure | Door swing and track position | Must not block transfer or controls |
| Drain slope | Finished floor reference | Affects accurate height measurement |
For projects that include showers, faucets, mirrors, and accessories, review SourceZJ bathroom shower hardware options and commercial bathroom faucet selections to coordinate finishes and fixture locations before installation.
6. Choose the Right Grab Bar Material and Finish
In commercial bathrooms, grab bars must withstand moisture, cleaning chemicals, repeated gripping, and long service cycles. The most common choice is stainless steel, especially 304 stainless steel for standard commercial environments and 316 stainless steel for coastal, spa, high-humidity, or more corrosive environments.
Material and finish comparison
| Material / finish | Best application | Advantages | Procurement concern |
|---|---|---|---|
| 304 stainless steel | Hotels, offices, malls, schools | Durable, corrosion-resistant, cost-effective | Check wall thickness and weld quality |
| 316 stainless steel | Coastal hotels, spas, hospitals | Better corrosion resistance | Higher cost |
| Brushed stainless steel | Most commercial bathrooms | Hides fingerprints better than mirror polish | Finish consistency matters |
| Polished stainless steel | Premium projects | Bright appearance | Shows water marks more easily |
| Matte black coating | Boutique hotels, modern offices | Strong design effect | Coating adhesion and scratch resistance must be tested |
| Brushed gold / PVD finish | Luxury hospitality | Premium visual effect | Requires strict color matching |
| Nylon-coated grab bars | Healthcare, senior living | Warmer touch, high visibility options | Check cleaning chemical resistance |
For commercial projects, avoid selecting finish only by catalog photo. Request physical samples, test them under project lighting, and check compatibility with towel racks, faucets, shower sets, door handles, and mirror frames.
SourceZJ can coordinate grab bars with hotel-style bathroom towel racks and commercial bathroom mirror options for a consistent bathroom hardware package.
7. Follow a Controlled Installation Workflow
A commercial grab bar installation should follow a documented workflow, especially when hundreds of restrooms or guest rooms are involved.
Recommended installation workflow
| Step | Best practice | Quality checkpoint |
|---|---|---|
| 1. Review drawings | Confirm code, room type, fixture layout, and bar locations | Approved shop drawing |
| 2. Confirm backing | Check blocking, masonry, or backing plate position | Photo record before wall closure |
| 3. Mark finished dimensions | Measure from finished floor and wall surface | Height and centerline verified |
| 4. Drill carefully | Use correct bit for tile, stone, masonry, or panel | No cracked tile |
| 5. Seal penetrations | Apply appropriate waterproof sealant in wet areas | No water path behind wall |
| 6. Install fasteners | Use specified screws/anchors into approved substrate | No loose fasteners |
| 7. Fix flanges/covers | Align bar and covers neatly | Bar level and stable |
| 8. Test movement | Pull and push carefully after installation | No rotation or movement |
| 9. Clean and inspect | Remove debris, protect finish | No scratches or sharp edges |
| 10. Document handover | Record room, product model, batch, and inspection result | QC checklist signed |
For wet walls, sealing is critical. Any fastener penetration through tile, stone, wall panels, or waterproofing should be handled according to the project waterproofing specification. Poor sealing can cause hidden moisture damage long after the project is handed over.
8. Avoid Common Commercial Installation Mistakes
Mistake 1: Installing into weak wall material
A grab bar mounted only into drywall, thin tile backing, or weak anchors may appear secure at handover but fail during real use. Always anchor into approved structure.
Mistake 2: Measuring from unfinished floor
Grab bar height should be verified from the finished floor. Measuring before tile or flooring installation can create non-compliant final heights.
Mistake 3: Blocking the gripping clearance
Shelves, dispensers, shower controls, flush valves, and partition hardware can interfere with required grab space. ADA spacing rules include required clearance between grab bars and nearby projecting objects.
Mistake 4: Using decorative bars without structural proof
Some bathroom hardware looks like a grab bar but is not tested or designed as one. A towel bar is not a grab bar.
Mistake 5: Ignoring waterproofing
Every hole in a shower or bathtub wall can become a leak path. Use proper sealing and avoid damaging membranes.
Mistake 6: Mixing finishes from too many suppliers
Different “brushed gold,” “matte black,” or “stainless steel” finishes may not match. This is especially visible in hotel and premium office bathrooms.
Mistake 7: Not documenting inspections
For large projects, room-by-room QC records help resolve disputes, maintenance issues, and handover questions.
9. Build Grab Bar Requirements into the Procurement Specification
A clear commerce specification helps suppliers quote accurately and helps contractors install correctly.
Commercial grab bar specification template
| Specification item | Example requirement |
|---|---|
| Product type | Commercial bathroom grab bar |
| Application | Toilet room / shower / bathtub / accessible guest room |
| Standard reference | ADA / local code / project specification |
| Material | 304 stainless steel / 316 stainless steel / nylon-coated |
| Diameter | 1¼–2 in. circular section, or approved non-circular section |
| Lengths | 12 in., 18 in., 24 in., 36 in., 42 in., custom |
| Finish | Brushed stainless, polished, matte black, PVD gold |
| Mounting | Concealed flange / exposed flange |
| Load requirement | 250 lb force requirement or local equivalent |
| Wall substrate | Blocking, masonry, backing plate, bathroom pod |
| Fasteners | Supplier-specified and substrate-compatible |
| Packaging | Individual box, project label, room-type label |
| Documentation | Installation guide, batch record, QC checklist |
| OEM options | Logo, finish, length, flange style, packaging |
This specification makes quotations easier to compare. Without it, one supplier may quote a thinner tube, smaller flange, weaker screw set, or lower-grade finish, creating a misleading price comparison.
SourceZJ can help prepare OEM grab bar specifications for hotels, hospitals, senior living facilities, public restrooms, and commercial washroom projects.
10. Quality Control Before Handover
Final QC should not be limited to visual inspection. A grab bar must be secure, correctly located, comfortable to grip, and free from surface hazards.
Grab bar handover checklist
| QC item | Pass criteria |
|---|---|
| Location | Matches approved drawing and code requirement |
| Height | Verified from finished floor |
| Length | Correct bar length installed |
| Clearance | Wall clearance and object clearance maintained |
| Stability | No movement, rotation, or loose flange |
| Surface | No sharp edges, burrs, cracks, or abrasive points |
| Finish | No scratches, dents, discoloration, or coating defects |
| Waterproofing | Penetrations sealed in wet areas |
| Accessories | Dispensers, shelves, and controls do not block use |
| Documentation | Room-by-room record completed |
For large hotel or commercial projects, keep photographic records before wall closure and after final installation. This helps protect contractors, developers, and suppliers if future maintenance questions arise.
11. Maintenance and Replacement Planning
Commercial grab bars should be included in the facility maintenance plan. Even high-quality grab bars can loosen over time if they are exposed to heavy use, cleaning chemicals, impacts, or wall movement.
Recommended maintenance practices include:
- Inspect grab bars during routine restroom maintenance.
- Check for movement, rotation, cracked tile, missing covers, or corrosion.
- Replace damaged flanges, screws, or covers immediately.
- Use cleaning agents compatible with the finish.
- Avoid abrasive pads on polished or coated finishes.
- Keep spare bars from the same batch or finish series for replacement.
For hotel chains, office buildings, and healthcare facilities, it is useful to standardize grab bar lengths and finishes across multiple projects. Standardization reduces spare part complexity and improves long-term maintenance efficiency.
FAQ: Commercial Bathroom Grab Bar Installation
Business negotiations are welcome.
The best commercial bathroom grab bar installation starts before the installer picks up a drill. It begins with code review, wall reinforcement, product specification, fixture coordination, waterproofing planning, and supplier quality control.
For commerce buyers, the right grab bar program should answer six questions:
- Does the layout meet the applicable accessibility standard?
- Is the wall structure strong enough?
- Are the bar dimensions and clearances correct?
- Does the finish match the full bathroom hardware package?
- Can the installation be inspected and documented room by room?
- Can the product be maintained and replaced easily over time?
SourceZJ can support commercial bathroom projects with grab bars, towel racks, shower accessories, mirrors, faucets, and OEM/ODM bathroom hardware packages. For hotels, hospitals, office buildings, senior living facilities, and public restrooms, start with custom bathroom accessories manufacturing support to create a safer, more consistent, and more installation-ready bathroom accessory package.
 English
 العربية
 Русский
 Español